Suminagashi marbling is a Japanese paper marbling technique that involves floating sumi ink on water in concentric rings. While relatively easy, there are still a few things that can go wrong while you’re marbling, so here are some tips if you’re running into trouble on your marbled paper. This post was originally created to accompany my Suminagashi instructions found in the tutorials section of The Little Book of Book Making.
Here are the sources of the Suminagashi materials that I’m using in these photos:
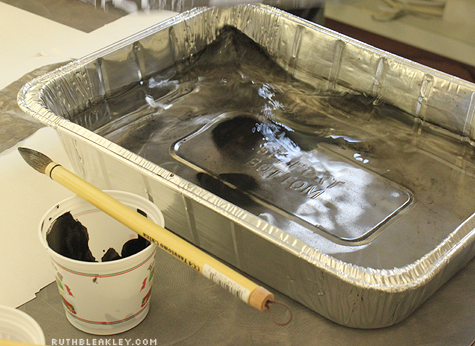
Black Ink: Yasutomo Liquid Sumi Black Ink 2oz
Color Ink (above): Aitoh Marbling Kit
Dispersant (add to water for “white” ink): Photo Flo or Marbling Surfactant (preferred)
Paper: Yasutomo Hosho Sketch Paper 9×12 (rice paper)
(note: Do NOT get the Hanshi paper, it’s too thin)
Brush: Chinese Calligraphy Brush
(the quality of this brush isn’t crucial since you’re only using it to dip, not paint you’ll need more than 1 – just get any of the same type of “medium” size – one for each color)
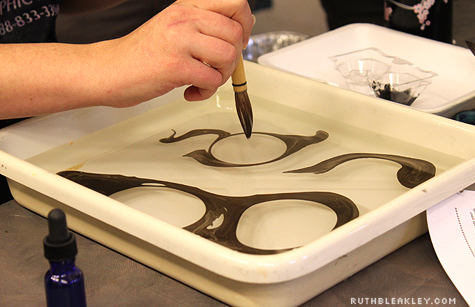
Problem: Suminagashi Ink Isn’t Floating
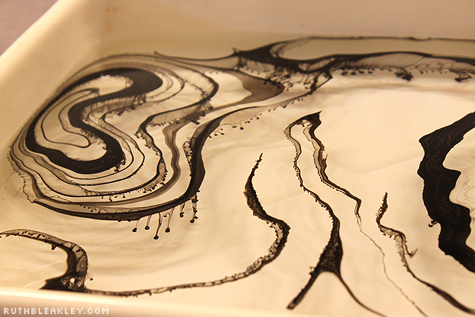
Answer: add another drop of dispersant to your ink, squeeze any excess ink from your brush with your fingertips, or try skimming the water before adding ink to the surface. If the water in your water bath is gray and murky, change the whole water bath and make sure to skim the surface before you dip your brush in.
Problem: Suminagashi ink rings are blurry after you make a print
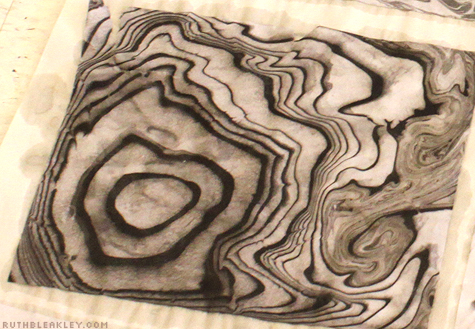
Answer: Too much ink – try holding your brush in the water for less time, so that less ink is deposited on the surface of the water, and/or after you make a print, submerse the entire sheet of paper under the water bath and gently shake back and forth to dislodge extra ink. Watch out, because this can make your paper super delicate and more likely to tear.
Problem: Sumingashi “whisker” marks on your marbled paper
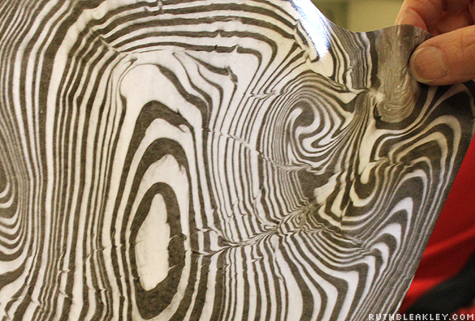
Answer: Printing too quickly. Instead, lay the paper down more gently when you take a print – whisker marks are caused by tiny air gusts flowing under the paper as you lay it down on the water’s surface. (they can also be a neat effect to experiment with)
Problem:Suminagashi ink rings aren’t expanding
Answer: Skim the surface of the water with newspaper strips thoroughly before you start adding ink to the water – dust trapped on the surface increases surface tension, and doesn’t allow rings to expand properly. If it’s still not helping, change the whole water bath.
Problem: Suminagashi marbling water is getting murky
Answer: squeeze excess ink from the brush with your fingertips, only dip the very tip of the brush on the surface of the water – no deeper than 1/8″ – imagine only dipping your fingernail into the water.
Here are some videos to show what I mean – the first one is me, and the second is my friend Jen, her very first try! Look how gently we dip the brushes, and how little they go into the water, I hope this helps! – in both cases we are using a 13×9 clear glass baking dish (look at the thrift store) with a white sheet of paper underneath so that we can see the rings:
Related Posts
Related Posts
Leave a Reply to Amethyst


41 Comments
Ruth,
Having trouble with my ink? I think it is very old but when trying to start the rings the ink will not float or then disperse! Above you mention “add another drop of dispersant” what is this exactly?
Help greatly needed as I am doing this lesson Monday!
Lisa P
Hi Lisa!
See the tips I gave Camille in another comment – but if your ink is very old, it may have settled quite a bit – I’ve found that some inks work better than others, and my favorite is yasutomo Sumi ink – dispersant is necessary, or else you won’t get separation between the rings of black – I will be posting a tutorial soon, hopefully, but in the meantime, you can find youtube videos about suminagashi marbling.
[…] easy, but there are still a few things that can go wrong while you’re marbling, so here are some great tips if you’re running into trouble on your marbled […]
I just started marbling yesterday. Everything seemed to go smoothly until I noticed that the water was holding a lot of remaining ink. I was still able to transfer ink to the fabric but so much ink was still in the tray. Am I suppose to clean out the remaining ink before I start again? Also, what is the best way to make the ink spread in the water mixture?
Hi Camille!
here are three tips for you to try, starting with a clean tray of water:
1. skim the surface of the water with a strip of newspaper BEFORE you start, that way it will pick up any dust that may be on the surface of the water
2. don’t dip the brush too far into the water – just barely touch it to the surface, just allowing a few hairs to dip in – just a millimeter or so – dipping it too far allows too much ink to fall below the surface of the water
3. be patient with the marbled rings – at first, it may appear that nothing at all is happening on the surface of the water, because the ink has to spread so far. Wait until you’ve laid down 10 rings of each color(white and black) to see if you need to add any dispersant to your ink.
[…] Bleakley has a lovely small post on how best to fix problems you might be having with suminagashi which you might want to read through before […]
Hello,
Thank you so much for your site and assistance to so many. This is very much appreciated! I am an art teacher. I have marbled paper with elementary students several times in the past with mixed results. Here are my issues…I would love to hear your thoughts. 1) I want rich, deep color like I have seen online and in bookbinding. I just can’t seem to achieve deep colorful results…reds print pink-ish…even when adding more drops of ink. Can you suggest a brand or technique for better results?
2) Can you recommend a cost effective paper stock?
Thank you!
Susan Yennerell
Hi Susan!
Unfortunately suminagashi will always result in pale pastel colors. IF you want bright colors, I’d suggest this basic kit from Pro Chemical and Dye, using a methylcellulose/carragean technique. You’ll also need to treat the paper with alum. Reading more about turkish marbling should give you some ideas on how this type of marbling works. Unfortunately I haven’t found a very cost effective paper stock, as the best results I’ve had are on cotton paper, which as you know is pricey!
Hi Ruth,
I have just started marbling. I have the Boku Undo Suminagashi kit. The problem is I want to make a black and white pattern, but i do not have white ink. Do you have any suggestions what i could use for the white/blank parts?
I tried eucalyptus oil, acetone, diluted acrylic ink, none seem to have the desired results though.
Hi Bonnie!
The white ink is created by adding a drop or two of dispersant to a teaspoon of regular water, so that the color of the paper shows through. Please see my updated materials list above for a source – unfortunately these are all US-based suppliers, but maybe you can find someone who sells surfactant in Australia, or something called “photo flo” or oxgall (really stinky)
Ruth, did you ever follow through on your intention to sell $20 suminogashi marbling kits? It’s a great idea!
Thanks for following up, Nancy! I got the ink bottles, now I need to find a supplier of brushes! I’m glad you’re interested – I’ll try to have a few kits ready for Christmas.
Hi. I have had no succes with suminagashi in the field of drying. When I lift the paper from the water, the colour runs down the paper and it takes severel days to dry. I think the reason is wrong type of paper. I have tried different kind, but nothing works. Do you have a suggestion to what kind of paper is the best, and where can I buy it.
Thank you. joern
Hi Joern! I’m guessing from your name and email address that you are from Denmark! Unfortunately I can only recommend paper to buy in the USA, but in general, I would look for textured (not smooth) handmade papers, or brown paper like they make grocery bags from. You want to choose a thicker paper rather than a thin paper, and just keep experimenting! The paint often runs off of the paper because it’s coated with calcium to make it acid free, so you want to try to find uncoated paper. Good luck!
Thank you Ruth, for your reply. I will keep on searching – outside Denmark.
Hello I have been using just ordinary copier paper to start with till I get the hang of all this, ink in one brush and soapy water (from a bar of soap) in the other and the ink sticks easily to this. Someone suggested inkjet paper it works fine but takes a bit longer for the ink to sink in. Hope this helps
Thanks Katie – I bet Cotton copier paper might work even better – in my experience the ink runs right off of regular copy paper because it’s coated with calcium to make it acid free.
Hi Joern, i have only just begun experimenting with suminigashi, with india ink and watered down acrylics on regular printer paper (no additions to the water). I have found rinsing the print in a clean water bath has solved the issue of the running ink. Sometimes i dip 2 or 3 times until the water dripping from the page runs clear. I am having wonderful results … Some colours are more faint than others, but line edges are crisp after rinsing.
Thanks for chiming in!! That’s a great tip – have you tried doing the marbling on brown paper grocery bags, or kraft paper? those usually work well with black ink
Hi, and thanks for posting all the info on Suminagashi. For my purposes I’m printing to fabric. Wondering what is the basis of the Sumi ink that is traditionally used, so I could possibly duplicate with other ink colors. I have the little set from the Japanese company, but would like more colors. Thanks
Hi Guiliana!
Unfortunately I don’t have any experience marbling fabric, but I think that the black sumi ink is oil based, which is why it floats on the water. Good luck!
Ruth
Just came across this post and, like Nancy, am also interested in kits. Seems like a cost-effective way to try something new. I’ll get in line for this!
HI Ruth,
Just started marbling with sumi ink on rice paper and just found your site! Let me know if you are selling suminogashi marbling kits as I would like one.
Thanks for all your posts and great info!
Paula
Hi Ruth,
Thanks for your website and info. I am writing to you from Europe. I have been having trouble finding a good surfactant- is this the same thing as a fluid retarder? Also I wanted to know about getting stronger color show up on the paper. Finally I wondered if you used other paper than the Japanese kind- I feel this is so delicate. I would be grateful for your reply.
Hi Cadine!
Thank you for writing in with your questions, how exciting that you live in Europe! I will do my best to answer them:
1) Surfactant causes the oil in the ink to spread, in the same way that a drop of dish soap will spread out an oily surface in the kitchen sink, so I’m not sure that fluid retarder is the same, since that causes paints to dry more slowly. Another thing that Surfactant is called is “Dispersant” – if you can find anyone in your country that sells supplies for dyeing fabric, they probably have something you can use.
2) Japanese paper comes in a variety of thicknesses, so I suggest keeping your eye out for a thicker type of paper – you’re right that some of it is so thin that it falls apart as soon as it hits the water! You can also try any paper that hasn’t been treated to be acid free – so, brown kraft paper, brown wrapping paper, shopping bags, any textured “handmade” type paper, and some fine art papers, especially ones with cotton content. I’d suggest experimenting with a variety
3) The color is going to be fairly faint, I haven’t figured out why sometimes it shows up much darker and other times very light, almost gray. I think it has to do with the paper and how much ink it’s able to soak up, so again, experimenting may give the best results.
[…] If you’re looking for some tips on marbling, check out my post Suminagashi Troubleshooting Tips. […]
[…] Troubleshooting Tips for Suminagashi Paper Marbling […]
Hello Ruth Am so new to this but love Japanese everything, and would dearly love to see you do a video if you could explaining everything in minute detail so that I don’t go wrong. I have noticed with some video’s they keep certain aspects out of the camera line and so have to guess which is no good to anyone. Love the examples at the top but not there yet. Best wishes Katie
Thank you for this guide, Ruth!
I had some problems getting the ink to stay afloat. Your recommendation for solving this is to ‘add another drop of dispersant to your ink’. But it says nowhere that dispersant is supposed to be added to the ink in the first place. How much dispersant can/should be added to the ink without ruining the whole thing?
Hi Jon! Which directions are you using? I have updated ones available here: https://sellfy.com/p/i2tt/ – in the worksheet I recommend one drop of dispersant/surfactant in the black in to start. Also, only certain types of oil based inks will float, in my experience, and not all sumi ink seems to be the same. You can always experiment with small quantities (like 1/2 tsp of ink and 1 to 4 drops of dispersant) to start
I am still waiting for my supplies to come and can’t wait to get started.I have watched a lot of tutorials. In one the lady said she uses dawn soap. Dipping her brush first in the soap and then in the paint. Looks so easy! Will this work? Also what type of brush do you recommend.
Hi Gail! I’ve just made available a worksheet that tells my technique in more detail, if you don’t own the book that these directions were published in: https://sellfy.com/p/i2tt/
I’ve never tried the soap thing, you’ll have to experiment! The last link above that says “Chinese Calligraphy Brush” is the type of brush I recommend. Good luck!
[…] stores), my first choice will be the Hosho kind — not Hanshi, which is sold unbound and, over the wind, I heard it is too light for suminagashi. If the Hanshi is there, though — I will have to […]
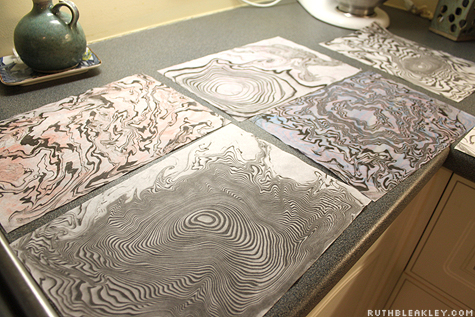
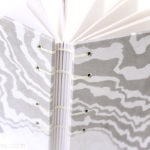
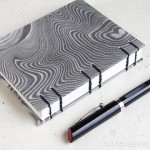
[…] at home, too! You can find directions I wrote here, along with links to find the materials online: Suminagashi Marbling Directions and Troubleshooting Tips. Â The paper you see here was only done with black ink, the gray variations were created by […]
Hello, I’m new to marbling and struggling. I bought a kit a few years ago, Boku-Undo is the brand I believe. Do these inks have a shelf life? I am having so much trouble with sinking. I’ve tried using the little paper circles included, the ink either just sits on the circles or dribbles off to the bottom; I’ve tried slightly touching the water surface with a brush, same result; I’ve tried drops from the bottle directly to the water, same result. Any ideas? Thanks.
Hi Jean! I’m sorry to hear you’re struggling with marbling!
First, it’s absolutely possible for inks to “Expire” in that they will separate and not work so well, especially if they are exposed to high heat (like in storage or something). However, if you want to try your inks again, maybe try these tips:
1. Make sure you shake the ink really really well, like at least 1 minute – if it’s been sitting for years, the particles may have sunk to the bottom of the container.
2. Wash out your marbling container well with soapy water and dry it completely, sometimes residual ink will get stuck in the tray and keep the ink from expanding
3. when you put new fresh water in (room temperature or cool water is fine), let it sit for about 5 minutes to off-gas and to settle
4. use newspaper strips to skim the surface so that any dust that has fallen on the water’s surface is removed.
OK! when you’ve done all that, try marbling again – the only way I’ve used boku undo is by dipping a brush in it, make sure your brush is saturated with the ink, but not so much that it’s dripping off the tip of the brush.
If you try all this and it still falls straight to the bottom of the pan, it’s very possible your batch of ink is too old.
I hope this helps! Please do report back on the blog, I’m sure your comments are helpful to others reading this post!
I’ve bought several boku undo kits to do with my students and cannot get the prints to come out. I’ve tried using lots of different papers, tried distilled water, cleaned the containers, etc and no luck. The prints are not crisp at all and in some cases, the ink just runs down the paper. I used these kits before and had no problems using drawing paper. Any thoughts on the problem? I’ve tried everything I’ve read except for using rice paper. That’s not cost effective as a teacher. And since I’ve had no problems before with drawing paper, I can’t figure out what’s going on. Any help would be so appreciated!!!! This site has been a great resource!
Hi Leah!
I have good news and bad news – the good news is, your kits are all fine! The bad news is, i’ve never had any success printing suminagashi on drawing paper or printer paper and I’ve tried all kinds. I’m not sure exactly what it is about drawing paper or printing paper that causes the boko undo ink to shed right off of the page, but I’ve experienced the exact same thing and it’s heartbreaking!
Here are some cheaper papers that I’ve used that work:
Kraft paper (including cut up paper bags)
Yasutomo hosho paper like the kind I link to in the article above (cut it in half and make smaller dipping trays if it’s expensive to do it in a large format – it’s much easier for students too)
Newsprint
most likely construction paper would work too – basically it has to be really cheap and uncoated, like one level up from a paper towel.
I’d love to hear back if you have time to try out any of these ideas! have the students iron their sheets of paper after the designs have dried for the best results.
Ruth
[…] Examples from Ruth Bleakley’s Studio […]
Hello Ruth ! Thank you agaun for these amazing tips, you are my guide on this journey ! I have one question for you though ^^” I think I’m doing everything by the book : I alumed my “ULTNICE rice paper”, I’m using Kuretake sumi ink 60, everything works perfectly on the water’s surface but I don’t know why the prints turn out very grey. I mean like I can’t seem to get any deep black. Any suggestions ? Maybe rice paper doesn’t apply for this as it’s so thin and therefore cannot absorb that much ink ? Thank you again for your help !
Hi Alex, good news and bad news – 1) the good news is, there is no need to alum “rice” paper (it’s not actually made of rice, it’s made from the mulberry plant) 2) the bad news is, some paper seems to absorb better than other paper. If the ink is actually sliding off of your print, leaving behind a pale gray ring, you should try a different paper (like the specific hosho one I recommend in the article.
If no ink is sliding off, that means you simply need to add MORE ink to the surface of the water, otherwise the ink you’ve added will simply spread and become more transparent, which will look gray. Try adding at least 30-50 rings of “black” and “white” rings and see how that comes out.
For practice prints you can use inexpensive kid’s “construction” paper like this – it is not archival or acid-free but it’s great for practice: https://amzn.to/2Dbzain