My advanced bookbinding class last spring took on the big project of coptic stitch books and so to reward them for all their hard work and patience as I worked out the kinks of teaching a group of people a very tricky stitch, I made everyone in the class these fun little accordion books! Here’s a step by step photo tutorial to make your own mini accordion books – it’s super easy and fun. Details and instructions on each step are below the photos.
If you’ve made some tiny books, I’d love to see them! Leave a link in the comments – Ruth


Materials:
• Scraps of thin decorative paper for covers
• filler paper (this can be regular computer paper – I used antique laid resume paper)
• thin cardboard for the covers (the kind on the back of a sketchpad will work fine)
• glue (I use PVA but any white glue would work fine)
• 1/8″ thin ribbon (you can also make it without the ribbon)
Tools:
• Heavy duty mat knife, or scissors
• metal ruler
• cutting mat (or cardboard, to protect your table)
• Foam brush (for glue)
• bone folder (optional, for folding paper)
Instructions:
1. Cut cardboard covers slightly larger than the size of your accordion, folded up. I made these strips of paper as wide as printer paper (8.5″) and about 2″ tall, then made the cardboard covers slightly larger than the inside paper by about 1/8″. I folded the paper first, then measured the folded size to determine the cover. I cut the cardboard with a utility knife and metal ruler.
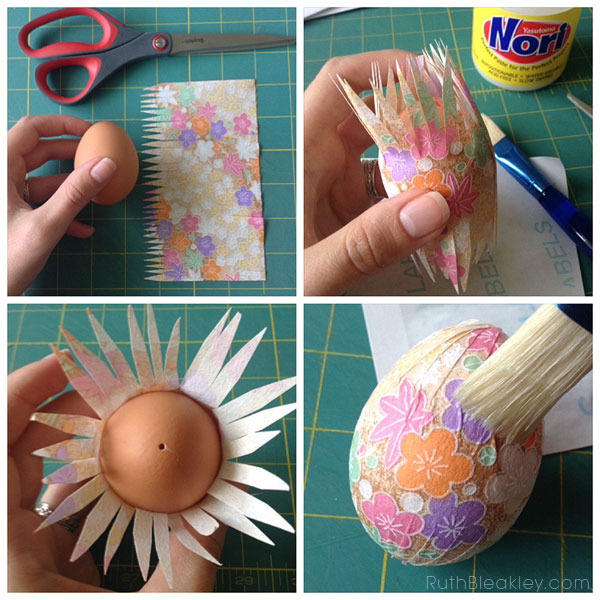
2. Cut decorative cover paper for the cardboard so that it overhangs all sides by 1/4″ and trim off the corners so they’re mitered (at a 45 degree angle) that way there’s less bulk in the corners when you glue them (third photo down from the top on the left). Apply glue and fold opposite sides together, long sides first, then top and bottom sides.
3. Gluing the inside is the trickiest – fold up your accordion inside, and put glue on the back of the last sheet – the side that will come in contact with the back cover of your book, and carefully center it on the back cover (large photo in the middle). For the front cover, put glue on the sheet facing you and then lay the cover on top like you’re putting together a sandwich, keeping the accordion folded (second photo up from the bottom, on the left).
4. Viola! If you like, cut a short piece of ribbon and glue it to the back of the book for a tie. Make sure there’s no glue sticking the pages of your book together before you tie it and leave it to dry.
If you’ve made some tiny books, I’d love to see them! Leave a link in the comments – Ruth
*pssst* I ‘m also on Pinterest – check out my Handmade Books and Journals Board
this post contains affiliate linksÂ
Related Posts


Related Posts

Leave a Reply


36 Comments
Fabulous little book….I will blog about this and link back. Thanks for the tutorial too!
Those little mini books are so charming, thanks for the tutorial!
Thanks Cynthia and Patty!
Ruth, nice work. I love the idea you gave us.
Thanks
thanks Regina, I’m sure there will be more in the future! I love tutorials
[…] Bleakley is a very talented book binder. Luckily, her tutorial for making these beautiful mini accordion books is simple enough even for the uninitiated! Ruth originally made these tiny books as gifts for her […]
[…] Bleakley is a very talented book binder. Luckily, her tutorial for making these beautiful mini accordion books is simple enough even for the uninitiated! Ruth originally made these tiny books as gifts for her […]
These are extremely adorable!! I might make a few as little gifts for my customers. Thank you so much for this easy to follow tutorial.
Lovely work!
SUPERBE
BRAVO
Love this! Thanks!
[…] To make your very own diddy-delight, pop on over and take a look at Ruth’s full minibook photo tutorial. […]
This is a beautiful project! I LOVE it! I think with an addition of a loop, it would make a sweet little Christmas tree ornament. Thank you for the tutorial!
Becky, I love the idea of these as ornaments – I’m one of those people that collects a new ornament for each year, so it would be cool to put “Christmas 2011” in it!
[…] ou simplement pour écrire un petit mot… Un tuto express à découvrir sur le site Ruthbleakley.com […]
Love it. thanks for sharing
Great tutorial! i love it very much,thanks for sharing.
[…] you have your drawing, use my mini accordion book photo tutorial to make a little book and you’ll have a lovely little tiny gift! February 2nd, 2012 | […]
Have just started making books recently. Love these accordion books, my 5 year old made one of Nessie the Loch Ness monster with tartan covers for his school project!
Thanks
Aww that sounds so fun!! Thanks for sharing 🙂
[…] Mini Book Photo Tutorial « In the StudioSep 4, 2011 … My advanced bookbinding class last spring took on the big project of … You’re welcome to re-post this on your blog if you kindly link back. […]
[…] Mini Accordion Book Photo Tutorial […]
Very sweet little book. My granddaughter would love this. She is into tiny little things.
Thank you for such a lovely presentation.
Frannie
Thanks Frannie!
whoah this weblog is excellent i really like studying your posts.
Stay up the great work! You know, many individuals are
looking round for this information, you can aid them greatly.
[…] by Ruth Bleakley…in the studio […]
[…] Also a great tutorial which you can find here. […]
Me gusto mucho su pagina, gracias por compartor los tutoriales con nosotras!
You’re welcome!
ME ENCANTA. MUCHAS GRACIAS POR LA IDEA.
So glad you like it, Tina!
Thanks for the tutorial! I’m about to start making these as inserts for the placeholders at my wedding reception. I’ll try to post a photo or two when they’re finished.
awesome! I’d love to see them 🙂 you can tag me on instagram, too @ruthbleakley
Me encantó tu sitio, será de mis favoritos.
gracias por compartir.
I’m a little late to the party but just have to say how beautiful your work is:) Love, love, love it! Did you do the calligraphy, or was that a printer?
Thank you so much Tracy! That was the printer that did that beautiful writing – I just printed it out before I cut up the strips for the insides of the book. You can find lots of great fonts on http://www.dafont.com