
Doesn’t that stack of folded signatures in the second photo look grand? I used acid-free card stock left over from a big project – I really over stocked on it a couple years ago when I had a class on concertina bindings. Unfortunately I discovered that the card stock was also too heavy for the type of binding we were doing – but not before ordering 200 sheets of it! Yikes – well, I never can resist a bulk discount…
So I trimmed the 12″x12″ sheets down to 9″x12″, which I then stacked in signatures of three sheets each. Normally I would do four or five sheets of paper per signature, but with thicker paper, you don’t want it to be too bulky.I folded them in half – what you see in photo 2 are four unsewn text blocks.

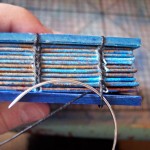
The top photo in this second step is after I’ve pierced (actually I’ve sawn them with an exacto razor saw) sewing stations, and I’m beginning the single needle coptic stitch with a straight needle. Sea Lemon has an excellent coptic stitch tutorial video if you’re curious about that. (Cool bubble ring handmade by Colleen Baran – a wonderful Canadian metalsmith)
I decided the paper was so thick that I wanted to try binding a book without covers. What I was picturing was a sketchbook that an artist could decorate on all sides. I wanted a way to close it though, because I know from carrying my own sketchbook that sometimes when you toss it back in your bag, the pages can become bent or wrinkled, which is no good! Plus if you wanted to add things to the book scrapbook style, it would be good to have something that would hold the book together.

Here’s how you set elastic with an eyelet – first you need an eyelet setting tool (yep, sorry, no real trick here – try a Cropadile, it will totally revolutionize eyelet setting for you). Then, punch the 3/8″ hole where you’d like it – for me it was on the back cover of the book. Then cut out a length of 1/4″ inch elastic – I got mine in bulk from a spool at the local sewing store. Thread both ends into the hole, flatten them where they come out on the other side (make sure to leave extra room so they don’t slip out when you’re pressing the eyelet). Thread the eyelet in (again, I used the bigger ones, not the mini 1/8″ ones). Flatten the eyelet with the eyelet setter, and viola! You can trim the ends a bit if you like.
Related Posts

Related Posts

Leave a Reply


10 Comments
Looks great!! Thanks for the tutorial too. Are you ready for some chocolate yet??
Thanks Cynthia! It’s still too warm for chocolate! but I’ll let you know 🙂
This is a great sketchbook. And the tutorial is very handy. I will give it a try.
Great tutorial! I was wondering how you started stitching the signatures together since yours is coverless? Did you just act like the bottom signature was the back cover?
Hi Jessica! Yes, I treated the bottom (or top) signature like it was the cover, and sewed down to the next signature to link it (you can see that in the first part of the second photo group) then I started doing the “chain” stitch with the third signature, linking it to the second signature (at least I think that’s how I did it – it’s been a while!)
Hey Ruth. I’m trying to figure out how to coptic stitch a book without a cover like yourself. I tried following the video tutorial you linked to in your post, but she uses a cover. I can’t find a how-to video on youtube that does’t use a cover. Can you help me, please?
Hi Joseph! It’s kind of hard to explain, but you would want to treat the first signature like the cover – I’m sorry I can’t be more helpful, my only advice is that you try making a few coptic stitch books the conventional way first, and then you’ll see how you can “skip” the cover
Incredible book! I took a peek at your portfolio and as an aspiring book binder and artist it was both inspiring and a bit intimidating. 🙂
I think it is great that someone like you who clearly knows what she is doing takes the time to share her knowledge in online tutorials, to give those of us who are just in the early stages new skills and ideas that we can then hopefully morph into something of our own.
I just wanted to mention this website I found that tells how to make a text block with Coptic stitch without any covers, just signatures (oddly, that’s the way I learned, in a terrific weekend long bookbinding for beginners class at a local folk school – we had made paper with the Japanese marbling technique suminagashi, for covers, but we had to let them all dry, not to mention letting the binding boards dry once they were covered – so I guess the teacher wanted us to get the stitching done in the meantime. The covers got glued on at the end). I’d forgotten how we did this – the Coptic stitch hardback with covers was literally the second book I had ever bound, we had a remarkable teacher -and was too embarrassed to email the teacher and let him know I hadn’t taken good notes, so I searched the net. I found your site, and noticed a couple of people also wondering how to do coverless Coptic stitching, so when I found instructions, I thought I should share. The instructions are in cartoon form, but if one knows the basics already, one can figure it out. Hope it helps. Thanks again for sharing your skills!
https://www.flickr.com/photos/andreweason/69683455/in/photostream/lightbox/
Thanks so much Greg! As for being intimidated, just remember that everyone was a beginner once, even me 🙂 I think it took me about 5 hours to do my first coptic stitch book 7 years ago, but since then I’ve made hundreds. Practice makes perfect! Keep it up!
ma che belle queste cuciture è possibile avere le istruzioni? grazie anna